Autor: acuervo

  • Maquinas virtuales remotas sobre RDP con VirtualBox en Ubuntu

    Una vez activado el servidor integrado de VRDP en VirtualBox, el resto es una conexión de RDP común y corriente usando el “Cliente de Terminal Server” bajo “Aplicaciones>Internet>”, excepto por las dos siguientes condiciones:

    1. El protocoloo a usar deber ser “RDP”, ya que “DRPv5” no funcionara.
    2. Aqui en donde todos tienen problemas. Para la direccion del servidor (Equipo:) se debe poner la IP del anfitrion (HOST) y NO la del huesped (guest) como normalmente se haria.
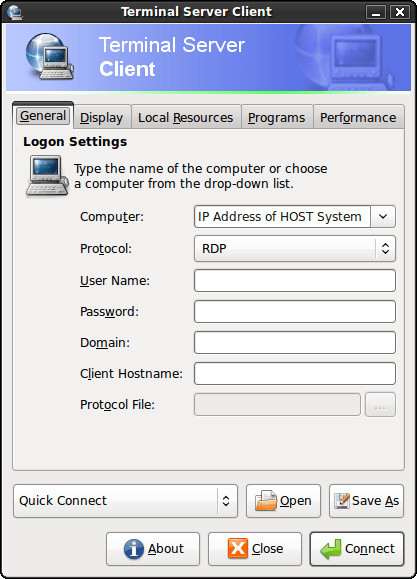
    Terminal server client Configuration for VirtualBox's VRDP
    Configuración de "Cliente de Terminal Server" para VRDP en VirtualBox

  • Java plugin de 64 bits para Firefox en Ubuntu.

    Ya no hay mas razones para no instalar Ubuntu de 64 bits. Primero fue Adobe con Flash de 64 bits y ahora Sun ha sacado el plug-in de Java en 64 bits.

    Para instalar el java plug-in de 64 bits en intrepid 8.10:

    1. Baje el archivo bin aqui
    2. cd /opt
    3. sudo sh jre-6u12-ea-bin-b03-linux-amd64-22_dec_2008.bin
    4. cd /usr/lib/mozilla/plugins
    5. sudo ln -s /opt/jre1.6.0_12/lib/amd64/libnpjp2.so
    6. Re-inicie Firefox

    Listo!

  • Native 64bit Java plugin for Firefox, on Ubuntu.

    Now there are no more reasons not to install 64bit Ubuntu. First is was Adobe with their native 64 bit Flash plug-in and now Sun has released a native 64 bit Java plug-in.

    To install the 64 bit java plugin on Intrepid 8.10:

    1. Download the bin file here
    2. cd /opt
    3. sudo sh jre-6u12-ea-bin-b03-linux-amd64-22_dec_2008.bin
    4. cd /usr/lib/mozilla/plugins
    5. sudo ln -s /opt/jre1.6.0_12/lib/amd64/libnpjp2.so
    6. Restart Firefox

    Done!

  • Ubuntu on MSI Wind with Ralink wireless radio

    I just got my wife a new MSI wind netbook. First things first, Installed Ubuntu.

    Everything just worked out of the box, except the wireless.

    Turns out MSI is using several wireless card suppliers. Mine came with a Ralink card. More specifically the RT2860

    The are several ways to fix it, but to keep things simple, I’ll go with debian’s way, which is also the easiest.

    1. Just download and install the following .DEB
    2. sudo apt-get install debhelper module-assistant
    3. sudo m-a a-i rt2860
    4. sudo modprobe rt2860sta
    5. sudo gedit /etc/modules , and append “rt2860sta” at the bottom. (without the quotes).
    6. Save the file, and connect with the Network Manager

    Done!

  • Installing Xmonad on Ubuntu

    This is the simplest (I think) that a window manager can get.

    From the makers:

    xmonad is a dynamically tiling X11 window manager that is written and configured in Haskell. In a normal WM, you spend half your time aligning and searching for windows. xmonad makes work easier, by automating this.

    A window manager that is completely different. To leave distractions aside and concentrate on real work, is very hard to beat xmonad. This is simplicity as its best. It Rocks.

    By the way, it can co-exist with your other windows managers so you can use it on a per need basis. Just chose it on the login window by pressing F10.

    http://xmonad.org/

    To install on Ubuntu:

    sudo apt-get install xmonad

    Be sure to read the guided tour first and learn all the basic stuff here otherwise I guarantee you wont get anywhere.

    The least you should learn is Alt-shift-enter to be able to open a terminal and Alt-shift-q to quit

  • SSH y X11 redireccionamiento

    1) En el computador que queremos acceder remotamente (llamemoslo anfitrion) instalamos OpenSSH

    sudo apt-get install ssh

    luego modificamos el archivo /etc/ssh/ssh_config

    cambiamos

    # ForwardX11 no

    por

    ForwardX11 yes.

    2) En el computador cliente, en la terminal:

    ssh -XC usuario@anfitrion (la C es para activar compresión, usuario es el nombre del usuario en el computador anfitrion)

    Y para arrangar la aplicaion remota, por ejempo firefox o tomboy

    firefox &

    tomboy &

    Listo!

  • Como instalar Flash 10 en Intrepid, Ubuntu 8.10 64 Bit

    IMPORTANTE, ACTUALIZACION: Adobe ha sacado una version de Flash en 64 bit, favor leer esta entrada

    Ahora que Intrepid (Ubuntu 8.10) salio, instalar la ultima version de flash 10 (ver 10.0.12.36) es mas facil que nunca antes, simplemente escriba lo siguiente en la termimal

    sudo apt-get install flashplugin-nonfree

    Listo!

    Como alternativa puede seleccionar el paquete flashplugin-nonfree en synaptic.

    Usuarios de Hardy, Ubuntu 8.04 LTS, ver esta entrada

  • Installing Flash 10 on Intrepid, Ubuntu 8.10 64 Bits

    IMPORTANT UPDATE: Adobe has released a NATIVE 64bit Flash Player, Please see this post

    Now that Intrepid (Ubuntu 8.10) is out, installing the latest version of flash 10 (ver. 10.0.12.36) is easier than never before, just type the following in your terminal

    sudo apt-get install flashplugin-nonfree

    Done!

    Alternatively you can simply select the package flashplugin-nonfree in synaptic.

    Hardy users, Ubuntu 8.04 LTS, see this post